INSTRUCTIONS
KRK Apartment 4 - PLATINUM


1. LOCKING DOORS
2. WINDOWS
3. DOOR SHADES
4. COOKING HOB
5. KITCHEN HOOD
6. OVEN
7. MICROWAVE OVEN
8. DISHWASHER
9. COFFEE MACHINE (CAPSULES)
10. WASHING - DRYING MACHINE
11. AIR CONDITIONER
12. TV
13. SAFE BOX
14. HOT TUB
15. INFRARED SAUNA
EXPLORE KRK
Your guide to exploring Krk — tours, events, top restaurants, top beaches, places, transport options, bike rentals
WI-FI (internet)
Name:
BASTINICA2
Password:
BastinicaKRK


GARBAGE

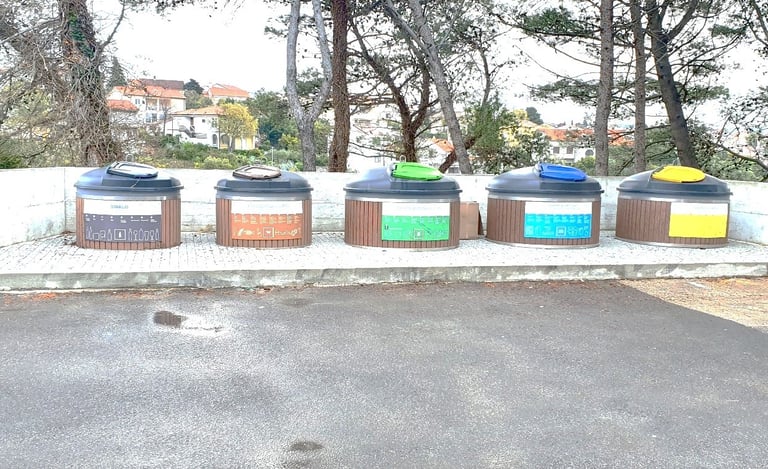
BLUE CONTAINER:
PAPER, CARDBOARD, MULTILAYER CARDBOARD PACKAGING
YELLOW CONTAINER:
PLASTIC AND METAL
GRAY CONTAINER:
GLASS
BROWN CONTAINER:
ORGANIC WASTE
GREEN CONTAINER:
MIX OTHER WASTE
PLEASE SEPARATE WASTE!
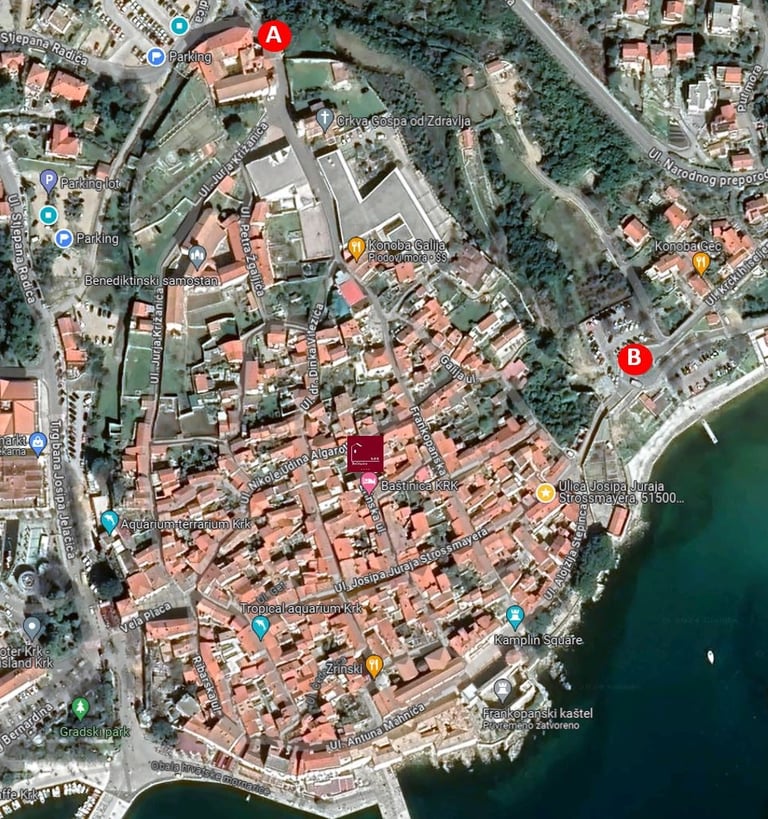
NEAREST LOCATIONS OF CONTAINERS:
A = near the parking lot
B = on the way to the beach

DOORS AND WINDOWS
1. LOCKING DOORS
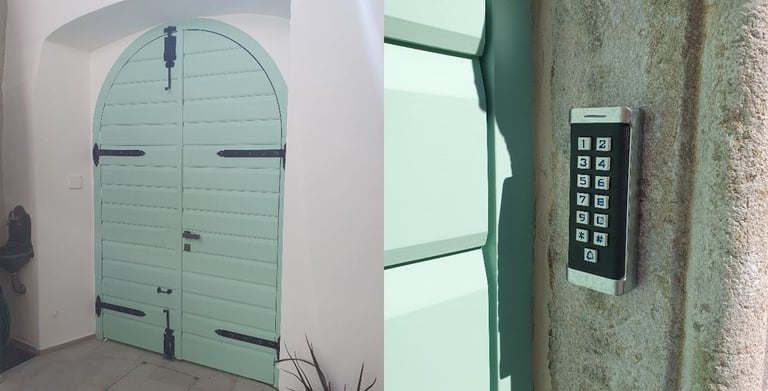
STREET DOORS
DON’T LOCK THE DOORS WITH KEY!
ONLY USE THE LOCK PIN TO OPEN THE DOORS!
IF YOU LOCK THE DOORS WITH A KEY, THE PIN LOCK CAN’T OPEN THE DOOR. AFTER ENTERING THE PIN, THE DOOR WILL UNLOCK FOR 3 SECONDS.


GARDEN DOORS - LOCK / UNLOCK VIDEO

GLASS DOOR - LOCK VIDEO

GLASS DOOR - UNLOCK VIDEO

2. WINDOWS
HOOK THE SHADES WHEN OPEN!
CLOSE ALL SHADES IF IT RAINS!
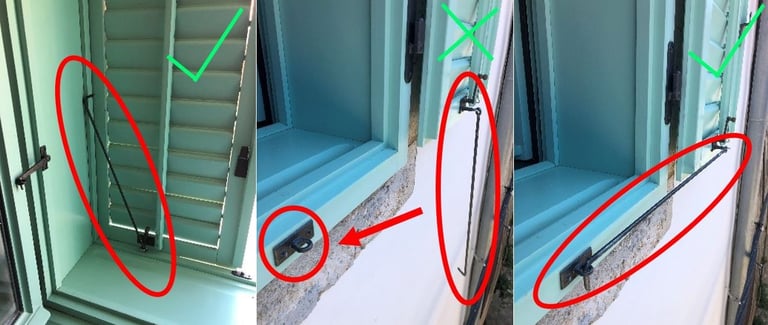


WINDOW with electric motor
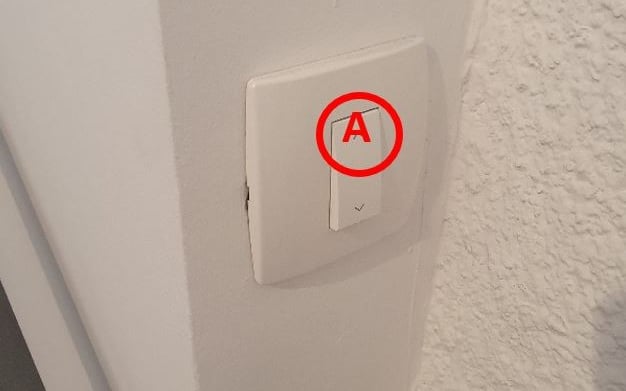
WHEN RAINS KEEP IT FULLY CLOSED!
PRESS A to close, and leave it.


3. DOOR SHADES
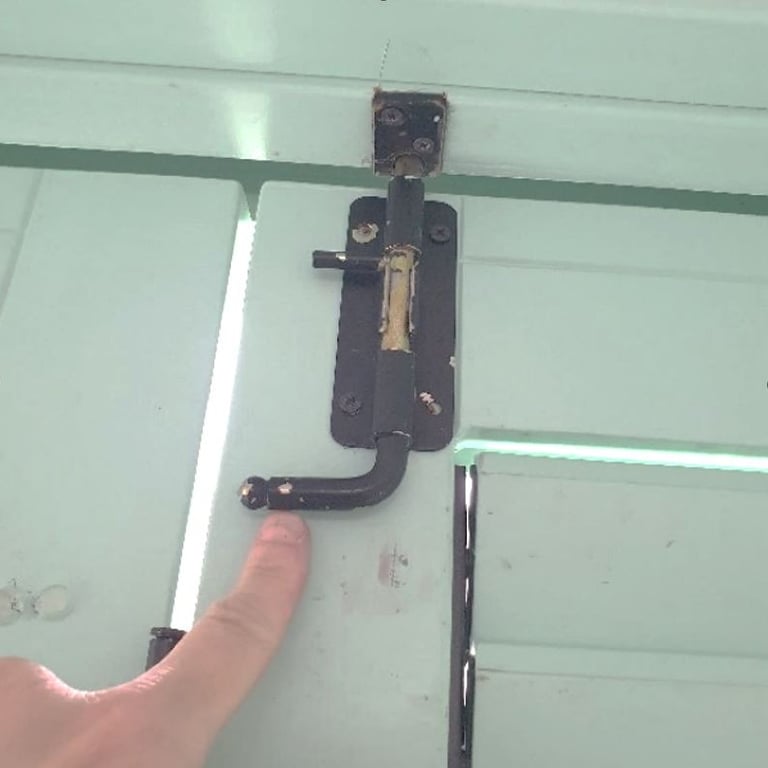
EVERYTHING NEED TO BE FIXED WITH THE HOOK SYSTEM ON THE SHADES.
OPEN OR CLOSED, THE HOOKS MUST ALWAYS FACE TO THE LEFT!
PLEASE TAKE YOUR TIME!

GARDEN SHADES - OPEN VIDEO

GARDEN SHADES - CLOSING VIDEO

GARDEN SHADES - DOOR STOPER VIDEO

BEDROOM SHADES - OPENING VIDEO

BEDROOM SHADES - CLOSING VIDEO

KITCHEN
4. COOKING HOB
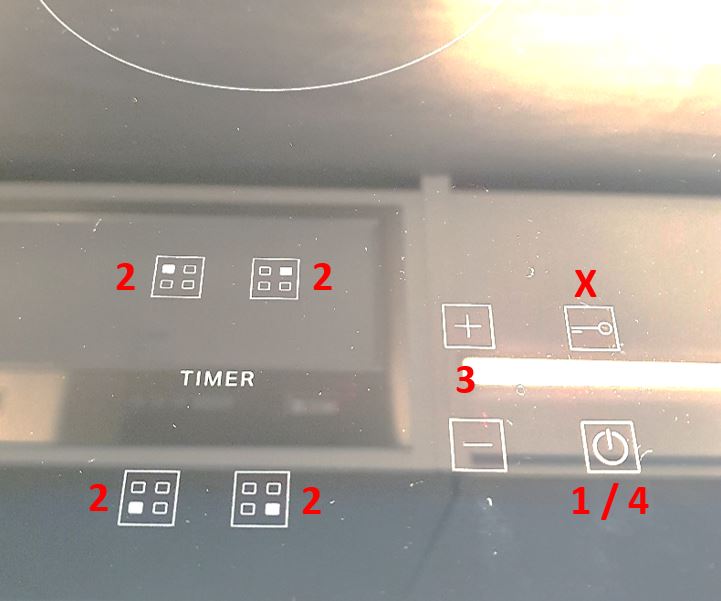
1 = Turn the device ON
2 = Select the cooking circuit
3 = Use + or – to set up heating
4 = Turn OFF the device
X = Lock – unlock controls
(press for 10 sec)

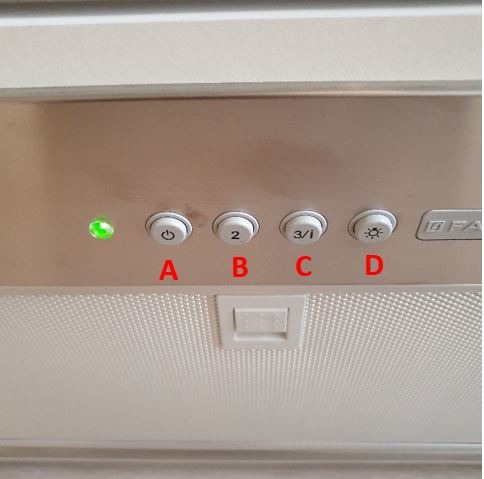
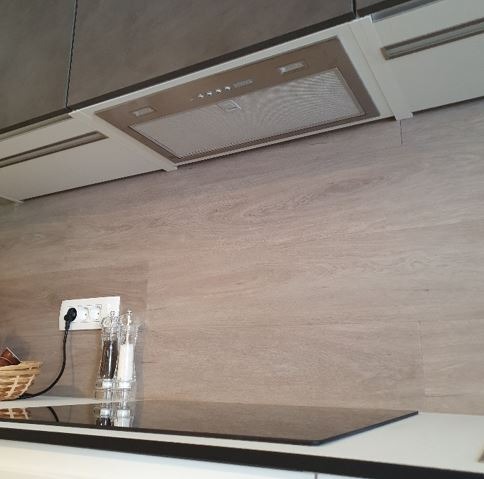
5. KICHEN HOOD
A = ON/OFF, speed 1
B = speed 2
C = speed 3
D = Light On/Off



6. OVEN
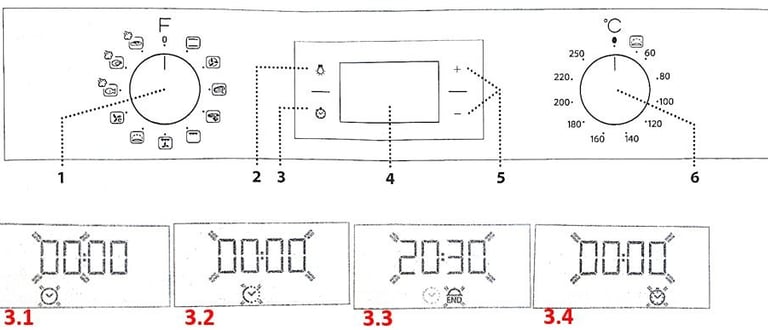
1 = SELECTION KNOB
Turn the oven ON by selecting a function. Turn to the 0 position to switch the oven OFF.
2 = LIGHT
With the oven switched on, press the button to turn the oven compartment lamp on or off.
3 = SETTING THE TIME
For accessing the cooking time settings, delayed start and timer. For displaying the time when the oven is off.
3.1 = Set the time (clock)
3.2 = Set the DURATION of cooking
3.3 = Set the END time
3.4 = Set the TIMER
(does not interrupt the program of cooking)
4 = DISPLAY
5 = ADJUSTMENT BUTTONS
For changing the cooking time settings
6 = THERMOSTAT KNOB
Turn to select the temperature you require when activating manual functions.


7. MICROWAVE
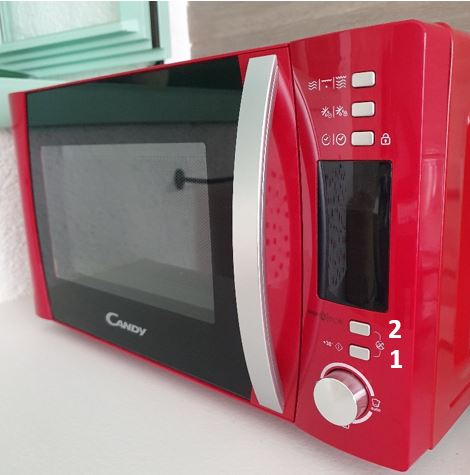
1 = press button 2 times (x2) to START microwave oven
+ 1 press for adding 30 sec to the working timer
2 = press button 3 times (x3) to turn OFF device

BEFORE USE,
EMPTY ALL METALS FROM THE MICROWAVE

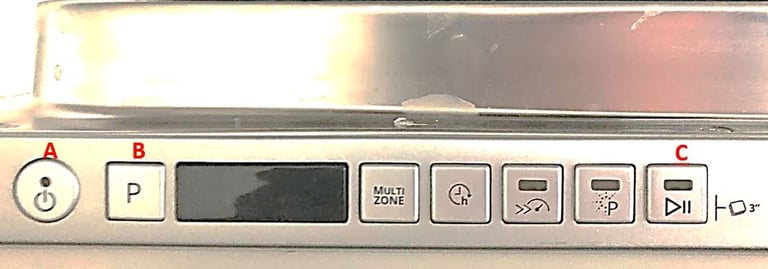
8. DISHWASHER
STEPS:
PRESS A to turn on the device
PRESS B multiple times to choose the program
PRESS C press start, also PAUSE
(if you press C when cleaning is in process, you will activate PAUSE mode, press C again to start from pause)

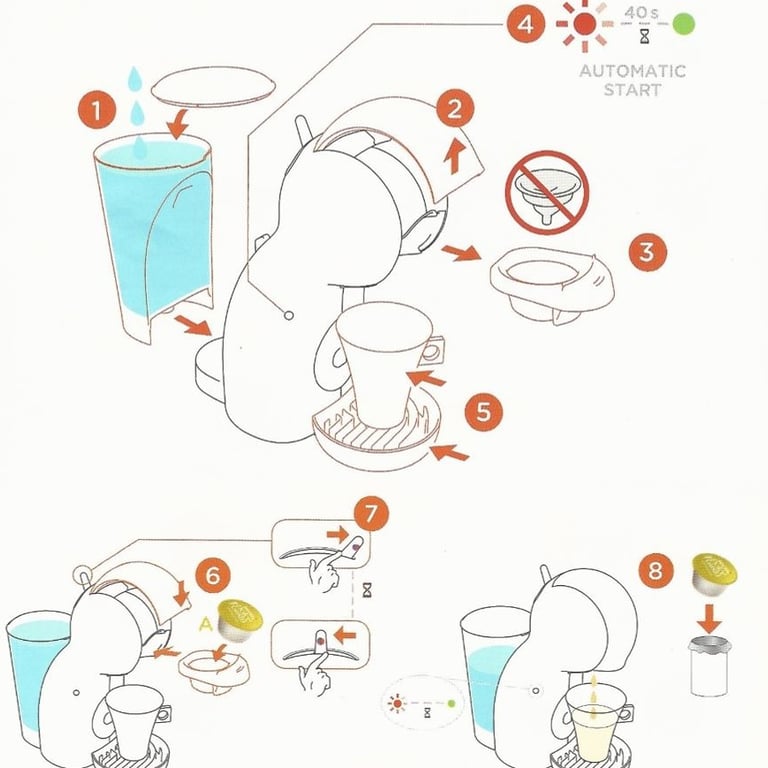
9. COFFE MACHINE (capsule)
USE ONLY CAPSULES FOR DOLCE GUSTO
STEPS:
1 = FILL THE TANK WITH WATER
2 = OPEN THE COVER
3 = PULL OUT THE CAPSULE CONTAINER
4 = WAIT FOR THE GREEN LIGHT TO COME ON
5 = INSERT THE CUP
6 = INSERT THE CAPSULE AND CLOSE THE COVER
7 = TURN THE KNOB ON HOT WATER TO START THE DEVICE
8 = FILL A CUP OF COFFEE (ESPRESSO = 15 SECONDS)
9 = TURN THE KNOB TO THE MIDDLE TO STOP THE DEVICE
10 = THROW AWAY CAPSULE


BATHROOM
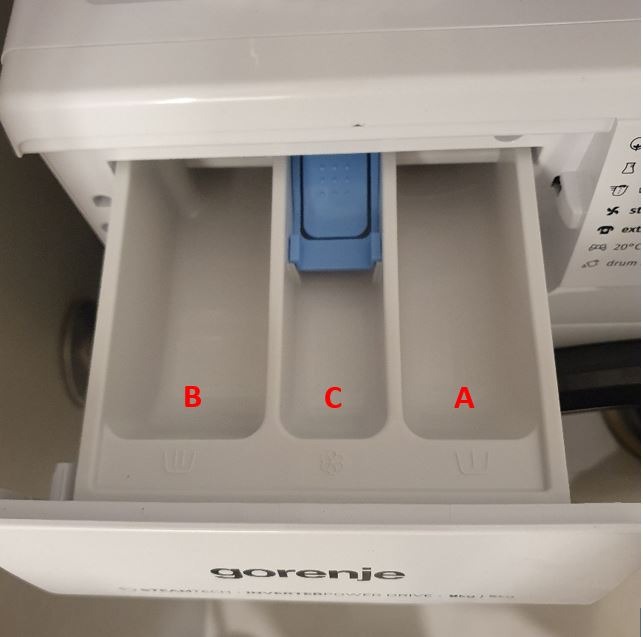
10. WASHING - DRYING MACHINE
A = Pre-Wash Detergent compartment
B = Main Wash Detergent compartment
C = Softener Compartment

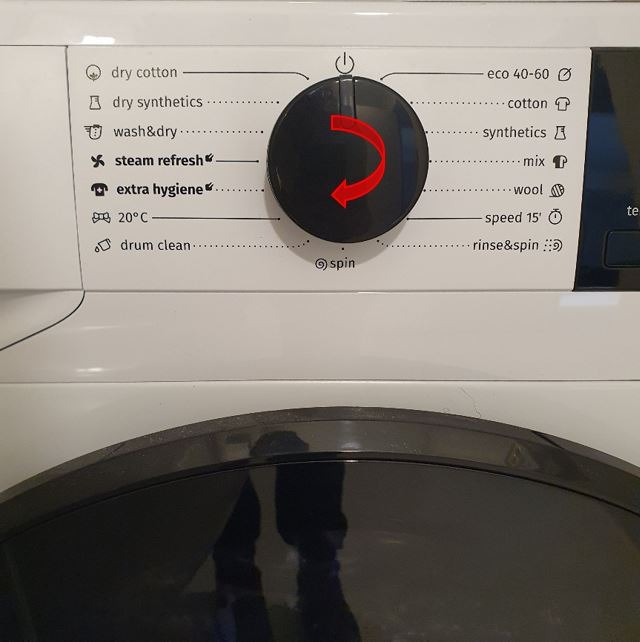

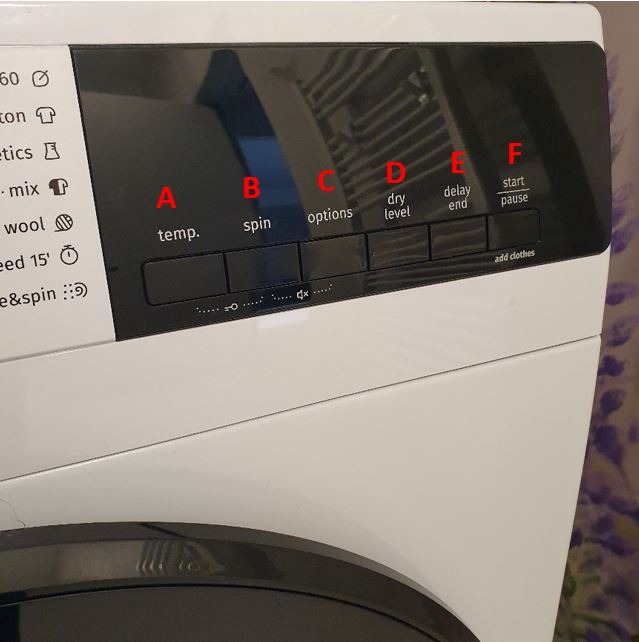

1. Turn to set up washing Program
(and to turn the device ON)
2. Set up addition options:
A = Temperature settings
B = Spinning settings
C = Option settings
D = Drying settings
E = Delay start settings
3. F = START / PAUSE
ROOMS
11. AIR CONDITIONER
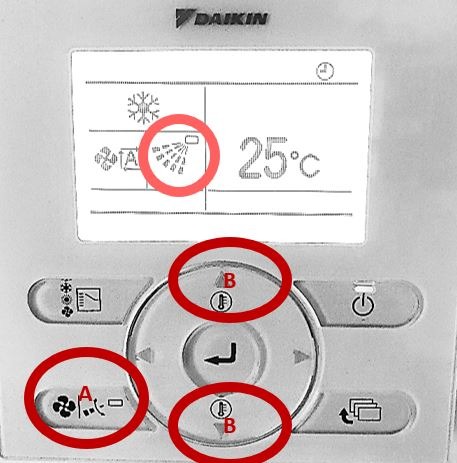
PLEASE DO NOT CHANGE THE SETTINGS OF THE DEVICE TO PREVENT DEVICE MALFUNCTION.
1. PRESS HIGHLIGHTED BUTTON (A) TO TURN ON OR TURN OFF THE DEVICE.
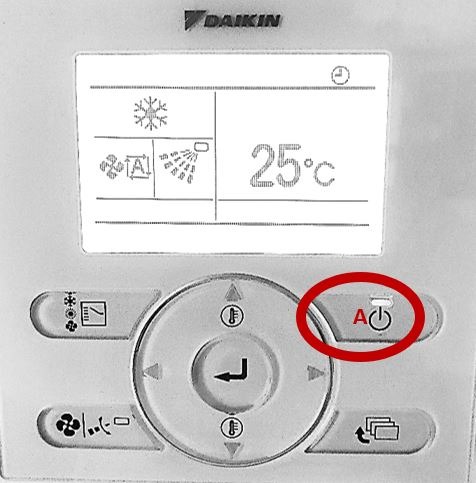

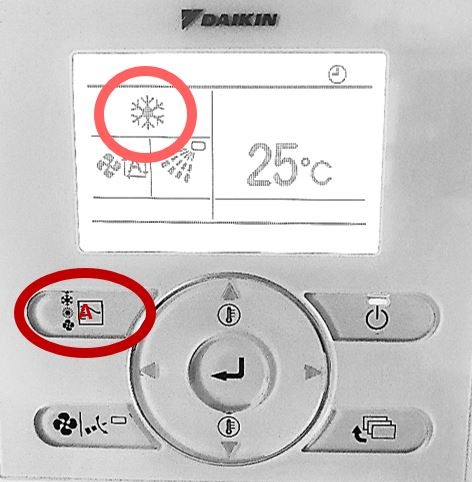
2. PRESS HIGHLIGHTED BUTTON (A) TO SET THE FUNCTION
NOTE: All individual units in every room CAN ONLY USE
1 FUNCTION at the same time
(if 1 bedroom has cooling on, other rooms can only cool as well).
FUNCTIONS
COOLING: In this mode, cooling will be automatically activated as required.
HEATING: In this mode, heating will be automatically activated as required.
FAN: In this mode, air only circulates without heating or cooling.
DRY: In this mode, the air humidity will be lowered with a minimal temperature decrease.
The temperature and fan speed are controlled automatically.
Dry operation will not function if the room temperature is too low.

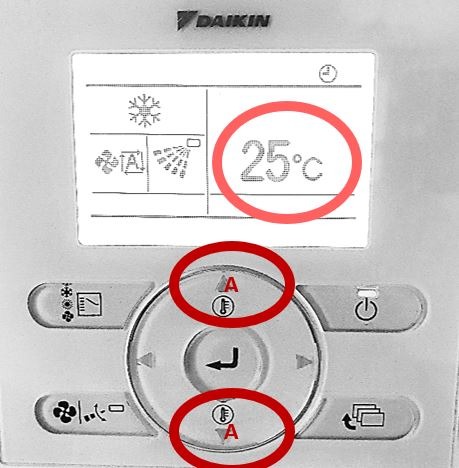
3. PRESS BUTTONS (A) TO SET THE TEMPERATURE. (in CELSIUS)

4. PRESS BUTTON (A) TO SET WIND FORCE.
PRESS BUTTONS (B) TO CHOOSE LEVEL OF WIND FORCE.

12. TV
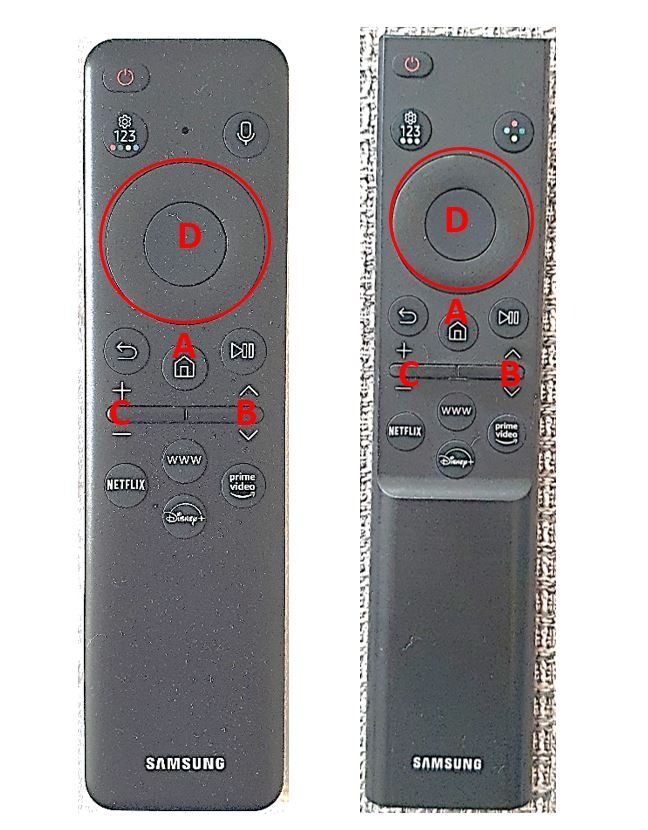
A = HOME – MENU BUTTON
B = CHANGE CHANNELS
C = VOLUME
D = USE TO MOVE AND SELECT
PRESS A (HOME BUTTON) and select:
LIVE TV – local cable network
NETFLIX – free Netflix account


13. SAFE BOX
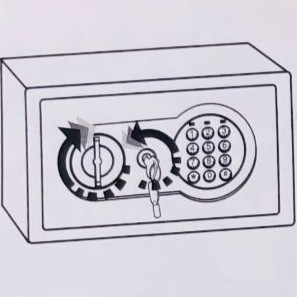
1. INSERT KEY
2. ROTATE TO OPEN THE SAFE

HOT TUB / SAUNA
14. HOT TUB
PLEASE COMPLY WITH THE HIGHLIGHTED RULES OF USE ON POSTER NEAR HOT TUB!
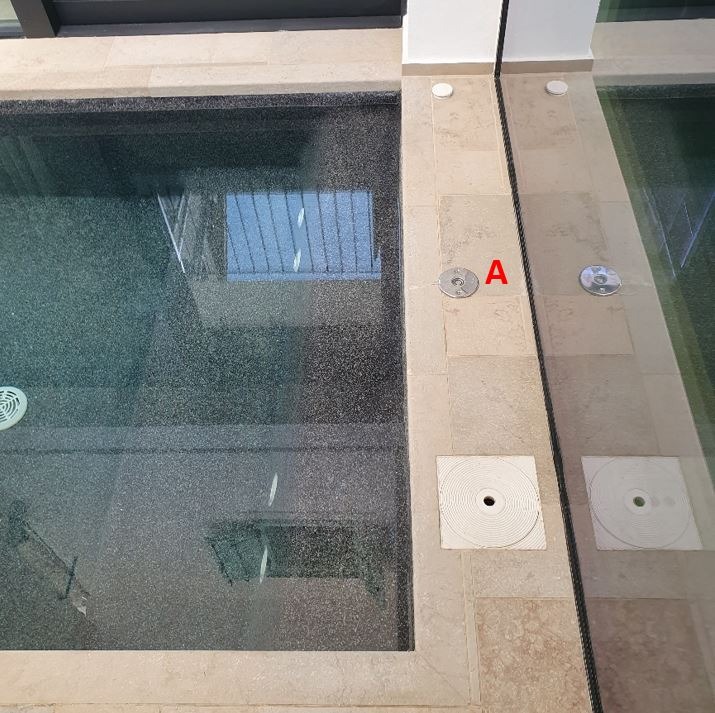
A = Press button and WAIT FEW SECONDS, to activate jets (massage).
The jets will TURN OFF automatically after 10 minutes!


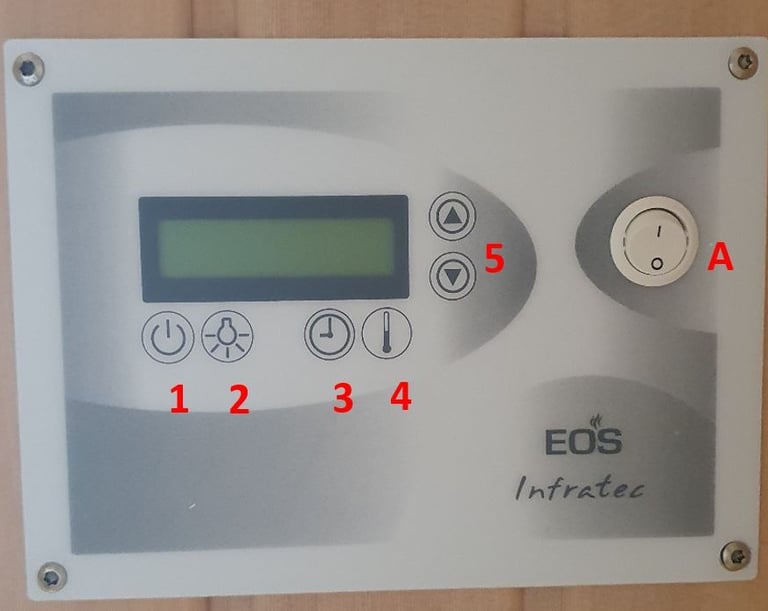
15. INFRARED SAUNA
PLEASE COMPLY WITH THE HIGHLIGHTED RULES OF USE ON THE POSTER NEAR THE SAUNA!
DO NOT BRING ANYTHING INTO THE SAUNA EXCEPT A TOWEL!
A = Press the main switch to I, to turn ON the device
1 = Turn ON the Infrared sauna
2 = Turn ON or OFF the lights
3 = Don’t use
4 + 5 = Set up temperature (60 Celsius are optimal)
1 = Turn OFF the Infrared sauna
A = Set the main switch to 0, to turn OFF the device

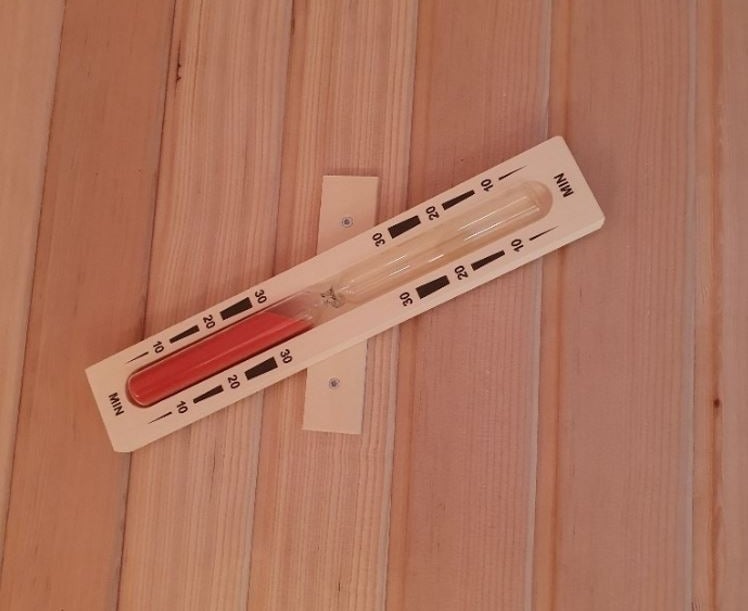


When you sit down,
TURN THE SAND CLOCK
to see your TIME in the infrared sauna!
